See with a camera
Open any camera behind one factory, turn it into a callback-driven stream with an
ImageHandler, and run an algorithm on each frame. Only the source changes between cameras;
the pipeline stays the same.
Pick your camera in the tab below and it stays selected through every step. New to the workspace? Do the Installation first; depth cameras also need the RealSense setup.
1. Install the vision module
2. Open the camera
CameraFactory.from_source(...) returns the matching driver for any key it understands:
A one-off frame is camera.get_frame(); depth cameras add get_depth_frame() and
get_distance().
The tabs above cover the common four. from_source accepts every key below; see the
Cameras reference for each driver's config dataclass:
| Key | Camera | Notes |
|---|---|---|
webcam / opencv |
Generic USB webcam | OpenCVConfig (resolution, fps, focus) |
realsense |
Intel RealSense D4xx | Color + depth |
t265 |
Intel RealSense T265 | Fisheye + host stereo depth + 6DOF pose |
oakd |
Luxonis OAK-D | Color + depth |
c920 |
Logitech C920/C920e | Profile-based OpenCVCam |
imx219 |
Raspberry Pi Camera v2 | Jetson (GStreamer) |
ros |
ROS 2 image topic | Any sensor_msgs/Image topic |
ros_depth |
ROS 2 color + depth topics | Depth-capable |
file |
Static image file | A path resolves to this automatically |
A file path resolves to file and a source starting with / to ros, so those two need no
explicit key.
3. Stream frames through an ImageHandler
ImageHandler wraps the source in a timer-driven ROS 2 node and calls your callback on every
frame:
4. Run an algorithm
Construct an algorithm and call it inside the callback. Each one follows the same shape:
| Algorithm | Class | Use it for |
|---|---|---|
| ArUco markers | Aruco |
Fiducial detection and 6-DoF pose (detect, pose_estimate) |
| Color | ColorDetector |
HSV/LAB color filtering (calibrate, then mode="preset") |
| Line | LineDetector |
Line following with Hough / RANSAC / ellipse methods |
| Distance | DistanceEstimator |
Pixel-size to distance regression |
| Hand / face | HandTracker, FaceMeshTracker |
MediaPipe landmark tracking |
| Optical flow | OpticalFlowEstimator |
Frame-to-frame motion |
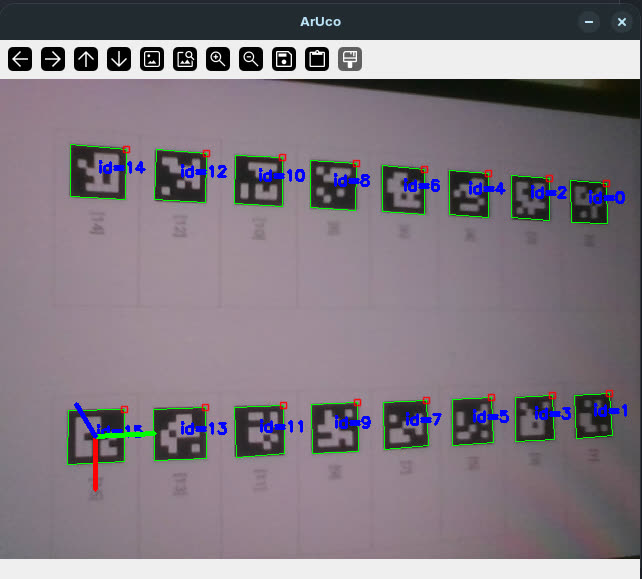
ArUco pose estimation returns the marker id, translation, and yaw and draws the axes on the
frame. Swap Aruco for any class above; the source stays whatever you picked in step 2:
import nectar
from nectar.vision import Aruco
from nectar.vision.camera import ImageHandler

nectar.init()
aruco = Aruco(marker_dict=5, tag_size=0.05)
ImageHandler(
    "webcam",
    image_processing_callback=lambda frame: aruco.pose_estimate(frame, draw=True),
    show_result="ArUco",
).run()
nectar.spin()
nectar.shutdown()
import nectar
from nectar.vision import Aruco
from nectar.vision.camera import ImageHandler

nectar.init()
aruco = Aruco(marker_dict=5, tag_size=0.05)
ImageHandler(
    "realsense",
    image_processing_callback=lambda frame: aruco.pose_estimate(frame, draw=True),
    show_result="ArUco",
).run()
nectar.spin()
nectar.shutdown()
import nectar
from nectar.vision import Aruco
from nectar.vision.camera import ImageHandler

nectar.init()
aruco = Aruco(marker_dict=5, tag_size=0.05)
ImageHandler(
    "oakd",
    image_processing_callback=lambda frame: aruco.pose_estimate(frame, draw=True),
    show_result="ArUco",
).run()
nectar.spin()
nectar.shutdown()
import nectar
from nectar.vision import Aruco
from nectar.vision.camera import ImageHandler

nectar.init()
aruco = Aruco(marker_dict=5, tag_size=0.05)
ImageHandler(
    "/camera/image_raw",
    image_processing_callback=lambda frame: aruco.pose_estimate(frame, draw=True),
    show_result="ArUco",
).run()
nectar.spin()
nectar.shutdown()
Exact constructor arguments and return types are in the Vision reference.
Expected result
The preview window shows the live stream with the algorithm's overlay (for ArUco, the marker axes and id).
See also
- Vision reference: camera drivers, algorithm APIs, ROS 2 nodes, and camera/color calibration.
- Vision examples: camera capture and depth examples.
- Detect, segment & classify.